Showing posts with label granny squares. Show all posts

Sunday, 14 July 2013

Double Crochet Granny Square

Aah granny squares again! But hey why not?! I had these beautiful Alize Burcum Batik yarns in shades of blue, green and brownish cream plus was in the mood to experiment with variegated yarns. Am so glad I did because the squares turned out to be oh-so gorgeous!!! The advantages of using variegated yarn is that you don't have to cut off your yarn and join with another colour for the next rounds, simply continue to crochet until end. For those crocheters (like ME!) who find it tedious and are lazy to weave in ends after each rounds, using variegated yarns is definitely the way to go!


MATERIALS
Alize Burcum Batik no.3904 (100g, 210m)


Crochet hook 6.0mm or US size J
Tapestry needle
Scissors
Ruler / Measuring tape

GAUGE
Use finished granny square as gauge.


ABBREVIATIONS
ch           chain
dc           double crochet
st(s)       stitch(es)


FINISHED MEASUREMENTS
Length: approx. 19cm x 19cm


NOTES
1 ball of 100g yarn makes 4 complete squares. You actually get 4.5 squares if you use up the whole ball.
I started off the first square with brownish cream part of the yarn so that I ended up with the blue tones at the outer sides of the square and vise versa.


INSTRUCTIONS
Rnd 1: ch4 (count as 1dc), 2dc, ch2, [3dc, ch2] x3 into 4th ch from hook. Join with sl st to 4th ch of beginning ch4 --- 4 clusters of 3dc & 4 ch2-sp [20 sts]. 


Rnd 2: Ch3, 1dc each in next 2dc, [2dc, ch2, 2dc] in next ch2-sp, [1dc each in next 3dc, (2dc, ch2, 2dc) in next ch2-sp] x3. Join with sl st to 3rd ch of beginning ch3 [36 sts].


Reminder: From Round 2 onwards, remember that when you are at the corners of the square you should crochet 2dc, ch2, 2dc. 


Rnd 3: Ch3, 1dc each in next 4dc, [2dc, ch2, 2dc] in next ch2-sp, [1dc each in next 7dc, (2dc, ch2, 2dc) in next ch2-sp] x3, 1dc each in next 2dc. Join with sl st to 3rd ch of beginning ch3 [52 sts].

Rnd 4: Ch3, 1dc each in next 6dc, [2dc, ch2, 2dc] in next ch2-sp, [1dc each in next 11dc, (2dc, ch2, 2dc) in next ch2-sp] x3, 1dc each in next 4dc. Join with sl st to 3rd ch of beginning ch3 [68 sts].

Rnd 5: Ch3, 1dc each in next 8dc, [2dc, ch2, 2dc] in next ch2-sp, [1dc each in next 15dc, (2dc, ch2, 2dc) in next ch2-sp] x3, 1dc each in next 6dc. Join with sl st to 3rd ch of beginning ch3 [84 sts].

Rnd 6: Ch3, 1dc each in next 10dc, [2dc, ch2, 2dc] in next ch2-sp, [1dc each in next 19dc, (2dc, ch2, 2dc) in next ch2-sp] x3, 1dc each in next 8dc. Join with sl st to 3rd ch of beginning ch3 [100 sts].


Fasten off and weave in ends.


Use up the whole ball...


What can I say... hmmm... got carried away i guess... couldn't stop crocheting the squares. Happy days!!!

Wednesday, 19 June 2013

Pretty Petals


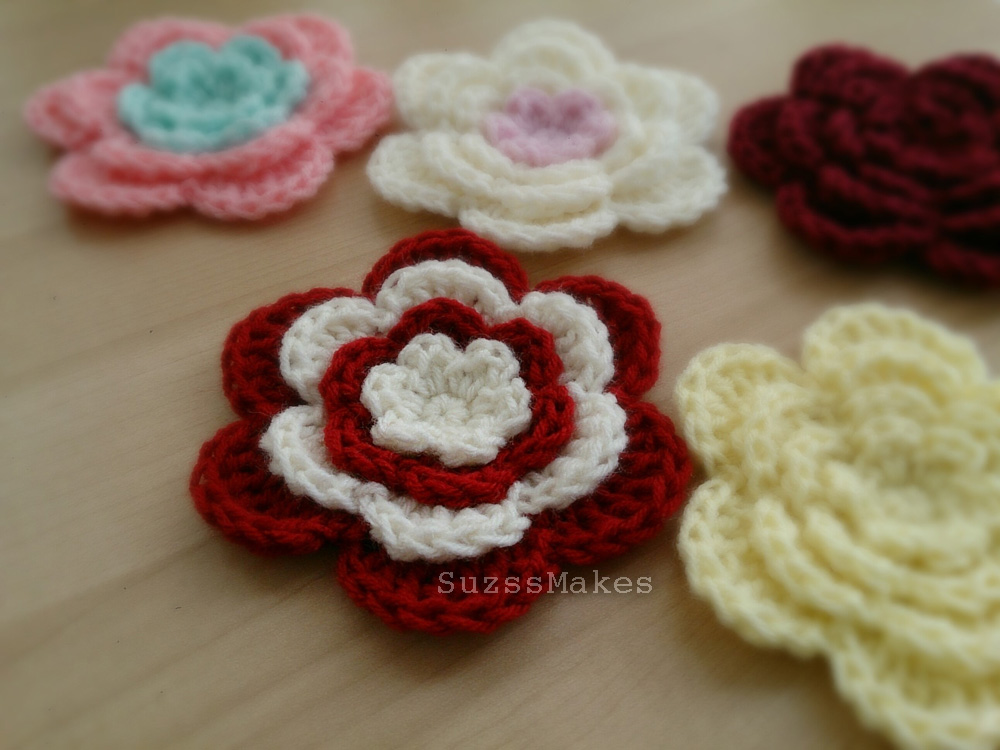
Recognise these pretty petals? They are the ones that I use to embellish my granny square in rounds hat. These flowers can be made from any leftover yarns and it’s totally easy to do. The best thing is you can choose how many layers you want to make, from just one layer to all four layers and it can be done in mere minutes. Make a pocketful (or a basketful... maybe?) of these pretty flowers to adorn your work or as gifts to your loved ones.

MATERIALS
A bit of 4-ply acrylic yarn in cream and red or any colours of your choice (about 40g)
Crochet hook 4.0mm or US size G
Tapestry needle
Scissors
Ruler / Measuring tape

ABBREVIATIONS
ch           chain
dc           double crochet
hdc         half double crochet
htr          half treble crochet
sc            single crochet
st(s)       stitch(es)
tr             treble crochet

FINISHED MEASUREMENTS
Diameter: approx. 9.5cm

INSTRUCTIONS
Rnd 1: With cream yarn, make 6sc in magic chain. Join round with sl st to 1st sc --- 6sc.


Rnd 2: *Ch1, 2dc, ch1, sl st* into same st at joint. Repeat *to* in next 5sc. --- 6 petals.

Note: Fasten off and weave in ends if you want to change to another colour yarn but if you are not, simply crochet a ch st and continue with Rnd 3.

Now you have the 1st layer of the flower... Next up, make loop spaces for the 2nd layer base.

Rnd 3: With red yarn and working behind Rnd 2, pull yarn through st in between petals and make a sl st (This will be the 1st sl st). *Ch3, sl st to next between petals stitch*. Repeat *to* 5 times and crochet last sl st into 1st sl st to join --- 6 loop spaces.


Rnd 4: *Ch1, 3dc, ch1, sl st* into 1st loop space. Repeat *to* in next 5 loop spaces. Fasten off and weave in ends --- 6 petals.


Rnd 5: Changing back to cream yarn and working behind Rnd 4, pull yarn through st in between petals and make a sl st (This will be the 1st sl st). *Ch4, sl st to next between petals stitch*. Repeat *to* 5 times and crochet last sl st into 1st sl st to join --- 6 loop spaces.


Rnd 6: *Ch1, 1dc, 3htr, 1dc, ch1, sl st* into 1st loop space. Repeat *to* in next 5 loop spaces. Fasten off and weave in ends --- 6 petals.


Rnd 7: And now changing back to red yarn and working behind Rnd 6, pull yarn through st in between petals and make a sl st (This will be the 1st sl st). *Ch5, sl st to next between petals stitch*. Repeat *to* 5 times and crochet last sl st into 1st sl st to join --- 6 loop spaces.


Rnd 8: *Ch1, 1dc,1htr, 3tr, 1htr, 1dc, ch1, sl st* into 1st loop space. Repeat *to* in next 5 loop spaces. Fasten off and weave in ends --- 6 petals.


Go on make more of these pretty petals in any colour that delights you! Cheers & happy crocheting!!!


Friday, 22 March 2013

Granny Square in Rounds Mittens

It has been a long time since I last posted anything on my blog. So here's a very simple mittens for those who loves to crochet granny squares. Make them for your own baby, for charity or as gift to a friend.


Here's what you I use:


1 ball of (30g, 102m) 4-ply pink yarn
Little bit of cream yarn for the tie
Crochet hook size 3.5mm & 3.0mm
Scissors 
Darning needle
Ruler


Abbreviations (US):

ch     chain
slst   slip stitch
dc     double crochet
sp     space


Finished Size:
Approx. 9 x 8cm


Instructions:

With pink yarn and 3.5mm hook, ch3 (count as 1dc).

Round 1:
2dc, ch1, [3dc, ch1]x3 into 3rd ch from hook, join with sl st to 3rd ch of beginning ch3. 
--- 4 groups of 3dc & 4 ch1-sp.


Round 2:
Sl st into next 2dc, [sl st, ch2, 2dc, ch1, 3dc] in next ch1-sp. Then, [3dc, ch1, 3dc] each in the next three ch1-sp. Join with sl st to 2nd ch of beginning ch2.
--- 8 groups of 3dc, 4 ch1-sp & 4 between dc-sp.


After the 2nd round, your work should measure approx. 4-4.5cm in diameter!


Round 3:
Sl st into next 2dc, [sl st, ch2, 2dc] in next ch1-sp, [3dc, ch1, 3dc] in the next between dc-sp, 3dc each in the next ch1-sp, between dc-sp & ch1-sp, again [3dc, ch1, 3dc] in the next between dc-sp, 3 dc each in the next ch1-sp & between dc-sp. As with Round 2, join with sl st to 2nd ch of beginning ch2.
--- 10 groups of 3dc, 2 ch1-sp & 8 between dc-sp.


Your work would have curled up when you do the joining at the end of this round.


Round 4:
Sl st into next 2dc, [sl st, ch2, 2dc] in next between dc-sp, 3 dc each in the next ch1-sp, next 4 between dc-sp, next ch1-sp & next 3 between dc-sp. As with previous round, join with sl st to 2nd ch of beginning ch2.
--- 10 groups of 3dc & 10 between dc-sp.

Round 5-10:
Sl st into next 2dc, [sl st, ch2, 2dc] in next between dc-sp, 3 dc each in all between dc-sp til end. Join with sl st to 2nd ch of beginning ch2.
--- 10 groups of 3dc & 10 between dc-sp.


You can always add more rounds if you feel that you need longer mittens.

Round 11:
[6dc in next sp, sl st in next sp]. Repeat until end. Fasten off and weave in all ends.


Repeat Round 1-11 to make a pair!

Now, with 3.0 mm hook and cream yarn, crochet 90-100 ch stitch (up to you) for the ties. Slip it in between the spaces below the shell edging. 


Done! How fast did you crochet yours? You can also use the same colour yarn to make the tie. It's totally up to you.


Tuesday, 22 May 2012

Granny Squares

I have been wanting to share my patterns with you guys out there. So this is my first attempt and hopefully not the last. As I am currently making crocheted granny squares, I thought this will be the perfect start for me. So here's my first pictorial: The Granny Squares!!! It's simple and perfect for the beginner crocheter. Crochet away....

Tri-colour granny square.


Oh before that... you will need:

3 different colours of yarn
1 crochet hook (of course!)
1 yarn needle (to hide all the yarn tails)

Abbreviations:
ch chain
slst slip stitch
dc double crochet
sp space

Foundation Ring: 
With first yarn (I'm using brown here), make 4ch and join with slst to first ch to form a ring.

Make 4ch.

Join with slst to first ch.

The foundation ring.


Round 1: 
Ch3 (count as 1dc), 2dc into ring, 3ch, *3dc into ring, 3ch*. Repeat *to* two times. Join with slst to top of ch3. Fasten off.

Tips: Leave about a 8 cm / 3 inch tail when you cut the yarn so you will be able to secure or hide the yarn easily.

Make 3ch.

2dc into ring.

Continue with 3ch.

Join with slst to top of ch3.


Round 2:
With the second yarn (blue here), slst to 3ch sp (the corner of Round 1), ch3 (count as 1dc), 2dc into the same sp, ch3, 3dc into the same sp, ch1.

With second yarn, slst to 3ch sp of Round 1.

Ch3.

2dc into the same sp, ch3.

3dc into the same sp.


Continue with the next 3ch sp, *3dc, 3ch, 3dc, 1ch*. Repeat *to* 2 times. Join with slst to top of ch3. Fasten off.

Join with slst to top of ch3.


Round 3:
With the third yarn (cream here), slst to ch3 sp (corner of Round 2), ch3 (count as 1dc), 2dc into the same sp, ch3, 3dc into the same sp, 1ch, 3dc into the next 1ch sp, 1ch.

With third yarn, slst to 3ch sp of Round 2.

Continue with the next 3ch sp, *3dc, 3ch, 3dc, 1ch, 3dc, 1ch*. Repeat *to* 2 times. Join with slst to top of ch3. Fasten off.

Work your dc into the sp. 

Slst to top of 3ch and fasten off.

Voila!!! There you go... Secure all the yarn tails and your granny square will look like this one here!


If you want to add more rounds, just repeat the same instructions as before to join a fourth yarn to Round 3 and add another 3dc and 1ch to the next 1ch sp. Slst as usual and fasten off. You can turn it into a coaster or anything you want!!!


Actually I have made quite a few granny squares. I am planning to make a cushion cover. Will post some pics when it's done. Hopefully soon... and happy crocheting everyone!!!!